
Published Oct 12, 2022
A Guide to Building A Budget Borg
One Star Trek fan walks us through how he constructs his costume for conventions.

StarTrek.com / Rob DeHart
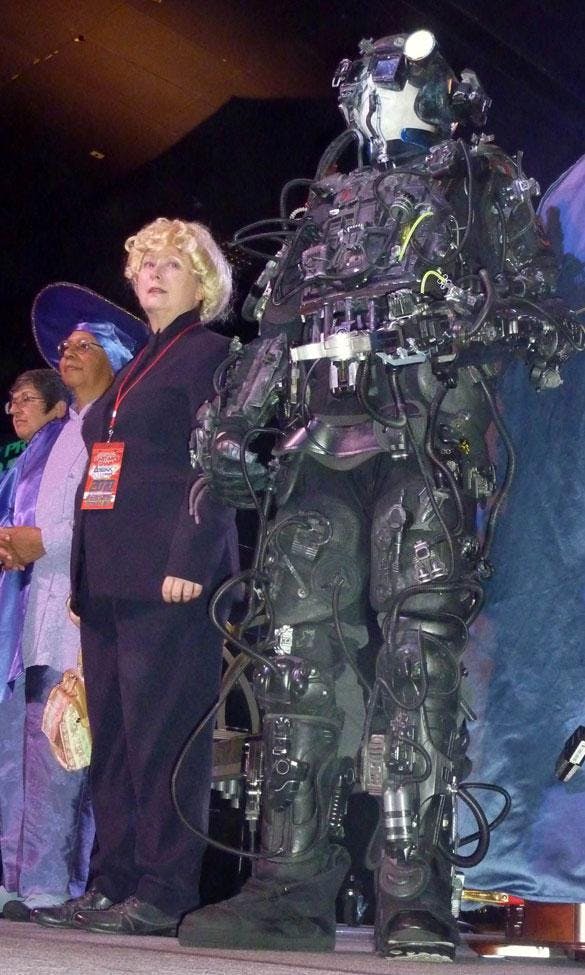
Eric Allan Hall must be a Borg. That’s what everyone who has ever encountered him (and his family) at any convention very understandably thinks. And for good reason — Hall's Borg costume is top-notch.
Even up close, his costume is amazing and creepy. He's won many costume contests with it, and yes, he made it himself. StarTrek.com invited Hall to share with readers how he created his killer costume, and he graciously obliged. Whether you're whipping up the costume for Halloween or for the next big convention near you, let this guest blog serve as a guide on your quest to assimilate with the Collective.
There are a few different ways to create a Borg costume — I have friends who use a sculpting and molding process, and the results look terrific. Learning new artistic skills and buying materials can take some time and money, though, so I'll share my simple, do-it-yourself method.
I have been working on my Borg costume since about 1993, when I first assembled it for a convention in the Seattle area. I wanted to "think like the Borg," so I used a variety of materials assimilated from local thrift stores, surplus stores, and yard sales. As time has passed, I have incrementally upgraded it to the point it's at today.
What You'll Need
TOOLS
- Black spray paint
- White spray paint
- Small bottle of black acrylic paint
- A small, model-size paintbrush
- Silver metallic paint marker, for detail work
- Fishing line or strong upholstery thread
- Large sewing needles, for attaching parts together
- Short wood screws, for attaching larger decorative pieces to the outside of the suit
- Multi-tool with pliers
- Screwdriver
- Cutting blade
- Small electric drill, with a drill bit and small sanding head attachment
COMPONENTS, AS YOU SEE FIT
- Black cotton blend trousers, as base layer
- Black cotton-blend turtleneck sweater, as base layer
- Child's baseball helmet
- Padding material
- Black tubing
- Goggles
- Sports gear
- Glow stick bracelets
- LED lights
TIP: Assemble a variety of materials assimilated from your local supply and/or thrift shops. The costume will come together in a unique way over time.
With that, I'll give a component-by-component description of what I used for the costume, starting from the top down.
Building a Budget Borg Guide
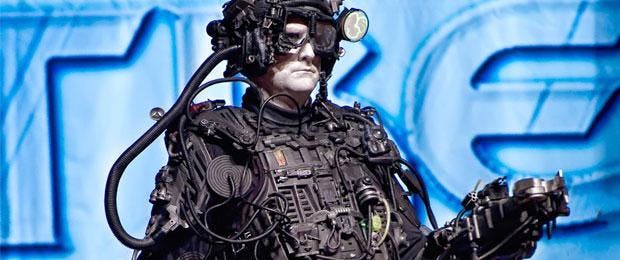
THE HEAD AND FACE
The crown of the head is a child's baseball helmet spray-painted white to match the white greasepaint makeup that I use on my face.
I also use a bit of black makeup around my right eye to match the Borg look from the TNG episodes, and then I use baby powder and a powder application brush to set the makeup so it doesn't run, before I put the helmet on. I found some random electronic parts, including a flashing LED light from a toy at a yard sale, which gives the helmet a creepy, asymmetrical look on top.
The rest of the head is martial arts padding, such as those used in sparring practice. I added some toy parts sewn into some of the ventilation holes, and ran some black tubing (from a furniture store, the kind used to keep TV cables orderly behind the TV stand) out of some of the holes that hook into the chest piece.
The left eye of the goggles is a hologram sticker of a spring — it looks really cool when the ambient light hits it right. Attached to the left eyepiece is a battery-operated plasma disc. There is a red LED under the right eye with a cord that runs down my right arm to my right hand with a switch I can trigger with my thumb and forefinger; this was originally a novelty toy used to light up your ears from behind, found at a joke shop. The right side of the helmet has a green laser pointer that I use at work as a corporate trainer; when I'm on stage during the costume contest, you can see the laser beam in the air.
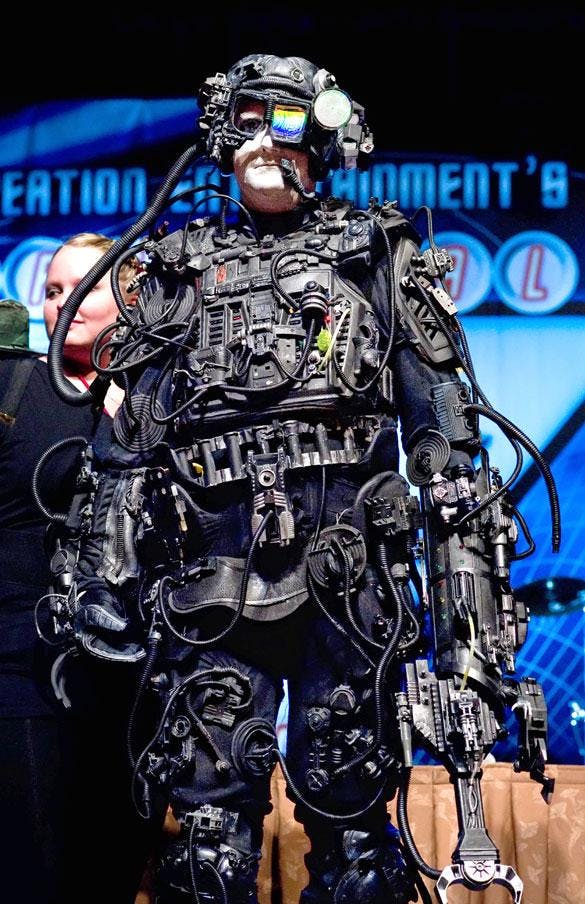
THE NECK, CHEST, AND TORSO
The core chest piece is bicycle motocross (BMX) gear. There are a series of flashing LEDs on the right side of the chest (from the brim of a novelty sun visor, but you can find similar LED arrays at craft and fabric stores), and I built a voice modulator into the left side of the chest that makes me sound like a Borg when I speak. The microphone comes up from the center of the chest to right below my mouth, and the speaker is positioned on the inside of the chest piece, so the speaker isn't visible. This was originally a toy from a thrift store, but you can find similar voice changers at novelty and Halloween supply stores.
There is an electronic picture displaying keychain in the middle top of my chest, where I loaded different Borg graphics onto it and it cycles through different pictures automatically. I attached various Borg-looking parts onto the outside of the chest, and ran some tubing through some of the slots in the chest armor down to the trunks.Underneath the chest piece, I wear a black turtleneck that I've sewn various Borg parts onto, using black upholstery thread for strength and durability. I used a small vinyl coaster, some tubing, and some plastic toy parts.The back of my neck is a small neck fan from an electronics shop. It helps to cool me a bit, but is mostly there for the overall visual effect. One benefit of my construction technique is that by wearing cotton-blend black trousers and a cotton-blend turtleneck underneath the Borg armature, I stay quite a bit cooler than I would in molded full body suit, and I don't perspire as much.
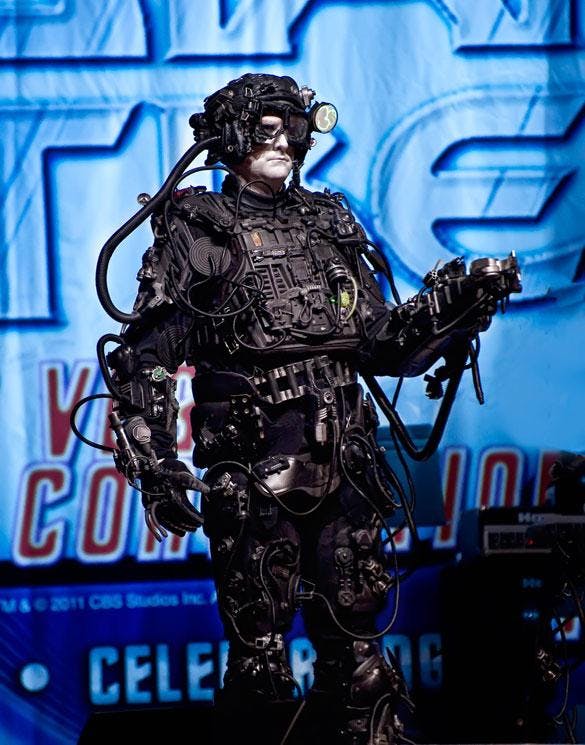
The right hand is a modified video game controller power glove that I spray-painted black and screwed various toy bits onto to make it more Borg-like. I used some larger black tubing (from a vacuum cleaner attachment) to attach my right shoulder to the right side of the helmet.The left arm is a large tube from a leaf blower, and a toy robot claw — the claw opens and closes. I added a small push-button motor from a toy into the left arm so I make a motorized sound when I walk. I recently added a plastic toy radial saw onto the left arm; using a soldering tool to lengthen the wires that run from the motor to the power switch so I could mount the saw on the arm and keep the power switch hidden on the inside of the tube. That way, I can activate the saw on demand to pose for photos of me assimilating future drones. I also used the drill to make some equidistant holes in the upper part of the arm, and I slid another LED array into the holes, keeping the battery on the inside of the arm, so it would look like blinking lights from the outside.
I have used green glow stick bracelets from the dollar store to run through some of the parts on the arm to look like a plasma flow, and I recently found some electroluminescent (EL) costume eyeglasses at an after-Halloween sale that I disassembled to get to the EL wire that I have used on the outside of the arm for an even brighter green glowing effect.
THE HIPS AND LEGS
The trunks are hockey pants with more Borg stuff sewn on. I used a small drill to bore through the plastic panels inside of the hockey pants, and then I attached bulkier external Borg parts on the outside by using screws (with the head on the inside of the pants and the screw tip going into holes in the parts on the outside).
The right leg is a snow boot, rollerblade padding, and the back of a space ship toy. The left leg is one of those things that protects your foot if you break your ankle and you have to wear a cast, and baseball catcher's leg padding, ornamented with toy parts and some tubing.
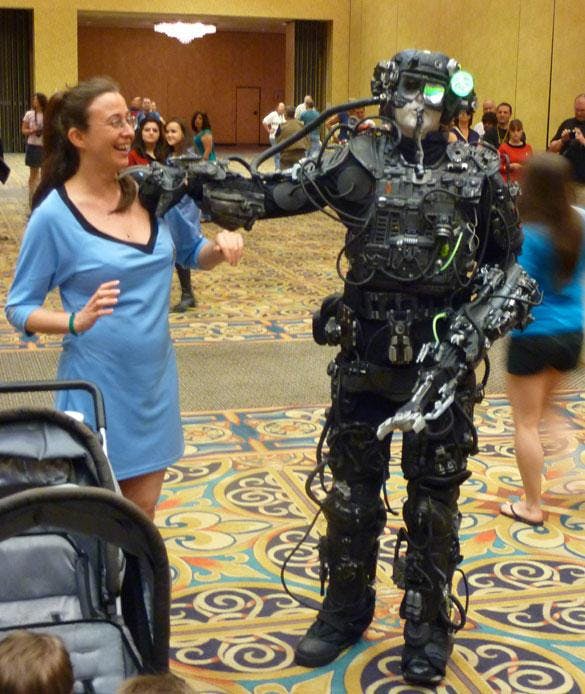
Once everything is assembled, you can lightly spray-paint the outside of the suit so the components you've attached will have a uniform color. I use a silver metallic paint marker to highlight edges, surface details, and trim, to contrast the black color.
I keep a box of potential and spare parts in my den, so if something needs repair or I want to upgrade something, I can easily find a replacement part. I also used spare parts to trick-out and Borg-ify a stroller that I bring to the convention for our kids, so that it looks like a mobile regeneration unit. As you shop the hardware and toy aisles at your local thrift stores, and as you go to yard sales, surplus stores, and rummage sales, be on the lookout for pieces that you can add to your collective.
And remember — Resistance is Futile!
This article was originally published on April 24, 2013.
Eric Allan Hall has been costuming since 1987. A lifelong Trekkie, he's been featured in his Borg costume in the documentaries Trek Nation, by Rod Roddenberry, and in William Shatner’s Get A Life. Transplanted to Utah from the Seattle area in 2001, Eric has attended about 80 conventions since he first started cosplaying – often with his family.
Stay tuned to StarTrek.com for more details! And be sure to follow @StarTrek on Facebook, Twitter, and Instagram.