Published Sep 30, 2010
Guest Blogger: Anovos - Costume Replicas
Guest Blogger: Anovos - Costume Replicas
Anyone who has attempted to create a high-end costume/uniform reproduction can tell you that even the simplest costume can be a struggle and a never-ending battle. Once you’ve made the mental and financial decision to start a project there are hours of research to be done and money must be spent on parts and material. When finally completed, there is the inevitable "upgrade" period to make it even better and more accurate -- and this can happen over and over, often until you lose interest over time or something new comes around. If you calculate all the time and upgrade cost you’ll be very surprised by just how much must be invested into such a project.
Now, what if the uniform/costume could be 99% out of the gate completed and you could enjoy the experience of having and wearing something almost right away, rather than spending time researching and constantly looking for upgrades? This was the idea that launched our company, Anovos.
Where does it all start and what efforts does it take? As stated earlier, even the simplest of elements are the most complex. In this blog, we’ll begin to explain the process we go through in identifying, simplifying and replicating/executing what you see on the screen to what is then offered to you in our costume/uniform replicas. One thing to keep in mind during this process: most costumes/uniforms have been developed and made years prior. Information on some items can be scarce and sometimes not even available to us.
Identify!
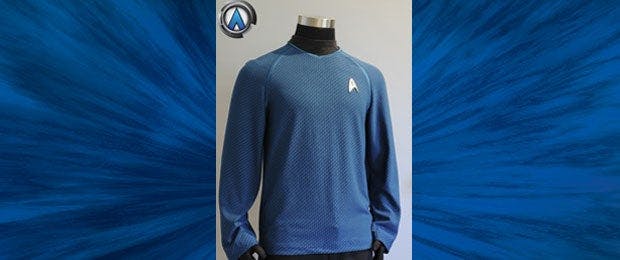
Take, for example, the Star Trek XI Tunic Uniform. This may appear to be a very simplistic uniform, but when you start breaking it down by its components it gets very interesting in how much actually goes into recreating the item as close to production-quality as possible. First, we identify basic elements of the costume/uniform, which can be numerous. Let’s use the Star Trek XI Tunic as our example:
1. The cut is a classic Raglan shirt, reminiscent of the TOS design
2. The delta patterns printed on the shirt
3. The specific color of the shirt
4. Matching the fabric
5. The detailing of the piping through the arm
6. Shape of neck and the piping around it
7. The command stripes
8. A final pattern to complete the whole shirt
9. How to affix the delta on the chest
Our next step was to identify what key elements created the total look of the shirt, or perhaps a better way to approach this is by asking yourself, “If I had three identifiable elements that had to be executed with perfection... what would they be?” Now, this part can be truly subjective, but we found that these elements were absolutely the basis of this shirt:
1. Fabric
2. Color
3. Print
We felt strongly that if we got at the very least three elements right, this would make up for the greater portion of the shirt. This is not to say that the other elements are less important, but if you start with these three, all others would fall into place.
Simplify!
So, now that you’ve seen the process of how we identified the key components of this garment, the question is… how were they made? In this portion, simplifying means breaking down these key elements even further, going backwards and understanding the processes. Even though it's a “simple” word, this is the part of the research phase which demands a high level of dedication and research.
As a company, one of our key tenets is not to settle on processes that will produce “like” replicas, but to stay faithful to the process, at best, to produce “Production Quality” product. All together, while the authentic process usually costs more, the public gets a shot at owning the best licensed replica available.
After determining the garment construction, key points to achieve, and how it should look, the investigative work begins – and it’s known as “backwards engineering.” In many cases, we had to actually learn quite a bit about the craft and methodology, as you will read.
1. Fabric. If you’re a fan of the Star Trek XI shirt, it’s commonly known that jumbo Spandex was used to create the look. What we learned quickly (as showcased in the Anovos blog), is that there’s an expansive world of Spandex and it’s completely common to have two stores carry two completely different types of fabric, but call it the same name. After learning about weight, polyester composition and weaving technique, our search led us back to a particular vendor. Upon further investigation and questions with this vendor, it serendipitously turned out to be the same source used by production. Case solved!
2. Color. The color portion of the research was initially stressful, as polyester is not something that can be dyed by just anyone. Realizing that not too many polyester or synthetic dyeing shops still exist in the USA, we were forced to ask for help and, thankfully, Paramount archivists, along with CBS and Bad Robot came to our rescue. We did some extensive paperwork research and were able to find a couple of the dye companies used to originally dye the initial test lots jumbo Spandex. After a few calls we brought over a sample of white jumbo Spandex and had them color match fabric swatches from the production fabric bolt. With the combination of old recipes and fine tuning, we were able to get the test swatches to match our screen-used reference pieces. Case solved!
3. Delta Pattern. Without a doubt, this was one of the project’s hardest parts. As you can see above, a general trend that helped us immensely was that we were able to source original manufacturers and services. The pattern was a completely different story. With no resources, we were now facing not only how it was done, but also completely recreating the process ourselves. Through our research and extremely high magnifications of the fabric it was discovered that the pattern was just printed similar to a silk screening process, but done continuously throughout the complete bolt of fabric. Attempting to replicate this process, we used our screen-used samples to derive our own printing pattern. We then had an immense printing drum laser etched with this pattern to produce our final print. Little did we know, this is where the fun would began (being sarcastic), as we went through countless iterations of the print, print color, and drum speed to capture the “perfect” delta. Can you say “minutia”? Regardless, with much effort, we proudly reproduced our perfect delta. Case solved!
4. Execution … This is the last step in the process and really deserves its own blog entry. The next time we talk, we’ll highlight the prototype construction process, the choices made, and how exactly this is put in your hands.
Keep up with us by visiting our website, Facebook and Twitter: ANOVOS.


